VLC Network Synchronisation

Here are two command lines to play 2 different video files in sync with VLC.

network clock client :
vlc --network-synchronisation --netsync-master-ip 127.0.0.1 sync-test-rouge.mp4
network clock master :
vlc --network-synchronisation --netsync-master sync-test.mp4

It seems to work only with videos of the same length.
Both audio and video are synchronized. The jitter compensation algorithm take a few time to compensate and after a dozen of seconds all videos are in sync.
It was tested on Ubuntu 13.10 with VLC 2.0.8, the two players on the same machine but it should work over the network.
Also the client must be started before master.

How to upload a sketch to all connected board

For das Körperrauschen project, I use an array of 5 Arduino micro and since they are plugged inside the sculpture, it is not convenient to unplugged them for upgrading one by one. And as I’m a lazy boy I search a way to upgrade them all at the same time. Since they run all the same code, I just made a simple script to upload all the connected board one by one.

Here is the script :

#!/bin/bash

for arduino in /dev/ttyACM* ;
do
ino upload -m micro -p $arduino
sleep 1
done

It searches all serial interfaces that looks like Arduino (/dev/ttyACM* on Ubuntu) and uses inotool to upload the sketch to them. Of course the folder should have the structure required by inotool.
Without delay, I can’t access the next board, and I don’t know why…

(R)Pianophone v0.2

The R(Pianophone) has been upgraded since last year (see http://antoine.villeret.free.fr/?p=427).
Here is the version 0.2 :
(R)Pianophone v0.2
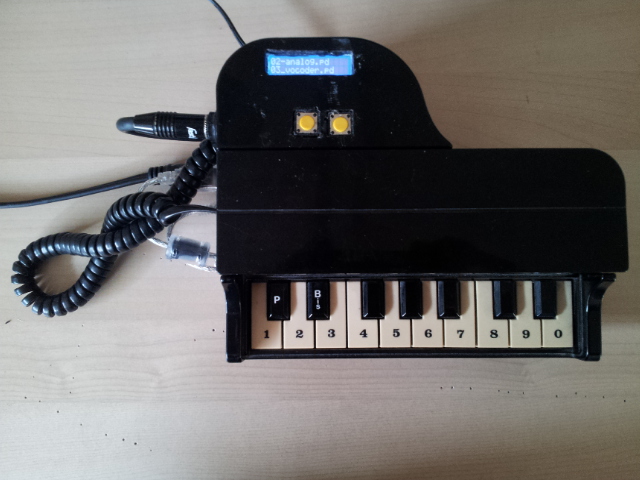
It has a nice 16×2 LCD screen and two push buttons.
The LCD displays Pd patches available on the SDcard and you can go up and down in the list thanks to the buttons.
I also added a USB sound card : ESI UGM96 with 2 inputs (mic and hi-Z) and 2 outputs.

The LCD is a Midas I²C device connected to the Pi through GPIO.
A small command line tool writes on the LCD.

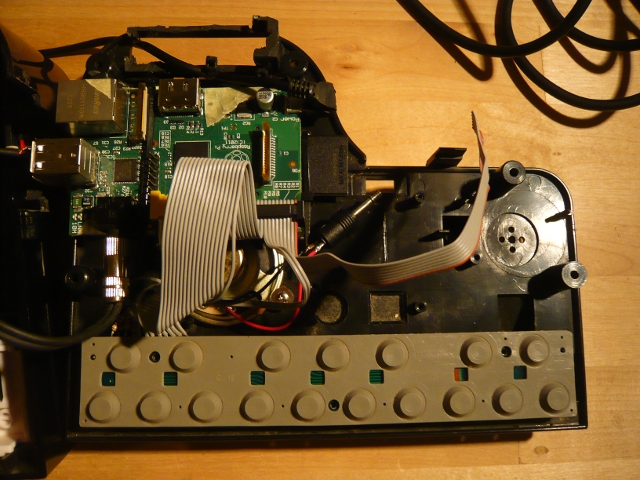
The two buttons are matrixed with the keypad and scanned in an infinite while loop.
When a patch is selected, its name is send through OSC to a main Pd patch and the patch is loaded.

To update the patches on the SDcard, just plug a USB key with some Pd stuff and all patches will be available on the (R)Pianophone.

The USB sound card makes me crazy because of lots of issues.
First I have to disable the ethernet chip to get audio input through USB with this command :
dhclient -r # release DCHP
echo -n "1-1.1:1.0" | sudo tee /sys/bus/usb/drivers/smsc95xx/unbind #disable the cheap

I also need to downgrade to the firmware revision of April 26, 2013.
sudo rpi-update 994e46341bd190ef4ce6ee011e3f9fb8173e2bbf
With the up-to-date firmware, I only got crakles when I disable the ethernet chip (and my USB keyboard goes crazy too…).

Moreover, as the analog synth emulation is eating a lot of CPU, I have to disable the audio input in this patch and to re-enable it the others.
This is done inside Pd by sending those messages to pd :
audio-dialog 2 0 0 0 2 0 0 0 2 0 0 0 2 0 0 0 48000 10 -1 64 to enable
and
audio-dialog 2 0 0 0 -2 0 0 0 2 0 0 0 2 0 0 0 48000 10 -1 64 to disable.
But those messages are not portables. I depends on the alsa configuration. You may find out which command to send by looking to tcl -> pd communication.
To do so, just put a [r pd] connected to a [print] somewhere in your patch and look to the Pd’s console when clicking on “Apply” in the Alsa configuration dialog.

One more thing, is that I got crackles when Pd is loaded directly from /etc/rc.local and I don’t know why…
But a workaround is to start Pd from /home/pi/.bashrc script instead.
It’s a bit crapy since Pd launches every time the pi user logs in and thus several Pd can be loaded at the same time.
But I can’t find a better way to avoid crakles…

RPi osc video player

i’ve just started an OSC video player on the RPi
for now, it’s just an embryo, it plays a demo video file defined in the code,
it’s a proof of concept : it can work but it needs some work
for now the only available feature is the 4 corners perspective correction (intended to be used with a video projector)

and i made a small pd patch to control the player

when i’ll have opportunity, i will add thoses features :
- OSC message to choose video file
- OSC transport control (play, pause, speed, loop…)
- OSC message to choose shader file and control its parameters
- command line arguments to choose video file, OSC port, and parameters

it’s based on the hello_video_cube example from Raspbian, so it uses the hardware decoding capabilities of the Pi

of course, it’s open source, feel free to test it : https://github.com/avilleret/rpi_osc_video_player

video player on Raspberry Pi

RPi sunning OpenELEC plugged in an old Sony Trinitron monitor
RPi running OpenELEC plugged in an old SONY Trinitron monitor

I made few tests with chnry on how to play movies with Raspberry Pi

we did the tests with a fresh Raspbian install and up-to-date
Raspbian comes with an integrated player dedicated to RPi : omxplayer
This uses hardware video decoding so it can play full HD h264 encoded film without lag.
The same is not possible with VLC (which only uses CPU decoding) we can’t find any codec which VLC can play smoothly but maybe it’s possible with a non CPU-expensive and small bandwidth codec.

Also we can heard some clicks on the analog output of the RPi when openning and closing omxplayer.
We guess this is due to the powering of the hardware but I think it could be handle on the software side.
For example, when Pd is sending some sound, and if we start playing a film with omxplayer we do hear clicks unless the sound card is powered.
Omxplayer seems to reset the sound card without regarding its state, so i think this is a bug.

So VLC is out on RPi, let’s try to control omxplayer over a network.
The simple way we find is using the udpreceive utility (which comes with puredata) and forwarding its output to bash.
On the RPi :
pdreceive 3434 udp | bash
and on the client :
echo omxplayer video.mp4 \& | pdsend 3434 192.168.11.11 udp

3434 is the port number
192.168.11.11 is the RPi’s IP
video.mp4 is the video we want to play (located in the RPi’s home)
\& go back to prompt just after starting omxplayer thus we can send other commands like killall omxplayer.bin to stop the player.

When no video is playing you will see either the command line or the LXDE interface.
With LXDE, you can set a black desktop, hide the menu bar and make the mouse disappear (with unclutter tool).

Next I will test how longer severals RPi can stay in sync and also I’ll take a look at XBMC with OpenELEC.

pix_freenect on Ubuntu 12.04

pix_freenect is one of the pd/Gem objects by Matthias Kronlachner to use Kinect sensor.
It’s not so simple to make it run on Ubuntu 12.04 64bit.
Here is a sum up of what I should do to make it work.
get the last libfreenect from git and make it (as the libfreenect package seems to not work with Matthias external) :
git clone https://github.com/OpenKinect/libfreenect.git
cd libfreenect
mkdir build
cd build
cmake ..
make
sudo make install

On my 64bit system, cmake puts the libs strangly in /usr/local/lib64 instead of /usr/local/lib. I moved all the files to /usr/local/lib, you can also make symbolic links.

I have to blacklist gspca modules to use the Kinect with freenect. I had a file named blacklist-gspca-kinect.conf in /etc/modprobe.d with that :
blacklist gspca_kinect
To prevent gspca module from loading on next reboot and to remove the module without rebooting :
sudo modprobe -r gspca_kinect

Now, get the latest pix_freenect code and make it :
git clone git://github.com/kronihias/pix_freenect.git
cd pix_freenect
mv Makefile Makefile_osx
mv Makefile_linux Makefile
make PD_DIR=/path/to/pd GEM_DIR=/path/to/Gem

You can also edit the Makefile and set the variables there. For me, the build failed because of unrecognized gcc arg : –export_dynamic. I edited the Linux LDLAGS variable on line 23 and replace by :
LDFLAGS = -shared -rdynamic
Make again and it should be ok. For now, pix_freenect can’t initialize when no Kinect is connected or if a wrong ID is set with arguments.

Ubuntu on Macmini6,1

I need to install Ubuntu on a Macmini 6,1 machine (late 2012) and as it was not without pain, I think it’s good to share my experience…
The first steps to create a partition and a boot system for Ubuntu were quite easy.
Here is a quick sumup :

  • boot on Mac OS
  • download rEFIt http://http://refit.sourceforge.net/ and install it (you have to manually install it because non-verified package installer could not start)
  • resize the Mac OS X partition with the Disk Utility
  • boot on a Ubuntu 12.10+mac 64 bit DVD (thanks to rEFIt) and install it on the new partition

At this step, the system is not working fine. There is no video acceleration, display is not recognized, no network driver…

The first thing I fixed is the network, so I can do update more easily.
I used my Samsung Galaxy SII to share a WIFI through USB and get the Macmini connected.
To make wireless working I followed the procedure explained here : https://help.ubuntu.com/community/Macmini5-1/Precise#Wireless_.28AirPort.29.
And to fix ethernet, I followed this : http://ubuntuforums.org/showthread.php?t=2078320 and made change like in post #5 then reboot.

To fix video I ran :
sudo add-apt-repository ppa:glasen/intel-driver
sudo apt-get update
sudo apt-get install xserver-xorg-video-intel intel-microcode mesa-utils

The intel-microcode may be useless.
The Intel HD4000 is now working but my full HD display attached to thunderbold with a miniDP to VGA adaptor is still in 1024×768.

To fix the last point I followed this : http://shanereustle.com/blog/force-screen-resolutions-on-ubuntu.html. This method is more convienent than manually modifying xorg.conf but this is not persistent so i made a small script that run thoses 2 commands on startup.

Pianophone

Hi,

Last week-end was rainy so I took the time to turn an old phone into a digital instrument.
The old phone has a piano shape and 17 keys, black and white. One octave and a third.

Pianophone

The original phone keyboard has two functionalities : dialing phone number and playing cheap synth.
The synth isn’t working anymore and I don’t care about the phone function.
Only 11 keys are used for dialing but fortunately, all the keys are connected to a keypad array easily available on the PCB.
This is a 4×4 array plus 2 discrete switch circuits.

Keypad and Rpi

I sold an old flat cable found into a computer of the last century (less powerful than a Rpi :-) ) and plug it in directly on the GPIO header on the Raspberry Pi.

Thanks to the libbcm2835 and the liblo I wrote a small program that scans the keyboard and sends OSC data on a multicast group.
I receive those data in puredata. Multicast is useful to develop synth : the same patch runs on my notebook and on the Rpi without any change in the configuration.
I used the Miller’s Raspbian image (http://pd-la.info/pdpi/) and the simplepolysynth.pd patch.
I will add an LCD screen and some push buttons to choose the patch to load.

All sources files are available here : https://github.com/avilleret/pianophone

Cheapest way to get analog input on Raspberry Pi

With Cyrille, we added 8 analog input to our synth on RPi for only 13€ thanks to the Byron !
More info here : http://www.1010.co.uk/org/byron.html

Here is how to get started with Byron on RPi.
Prepare the system :
sudo apt-get install libusb-dev avrdude avr-libc

Change the permissions settings to allow access to byron to normal user :
sudo leafpad /etc/udev/rules.d/41-byron.rules
add this :
ATTRS{idVendor}=="16c0",ATTRS{idProduct}=="27d8",MODE="6666",GROUP="pi"
save
unplug / replug the byron

Download byron (the address in the first line might be tuned if a newer version is available, see the link above) :
wget http://1010.co.uk/byron005.tar.gz
uncompress the file, change to the directory and make :
tar -xzf byron005.tar.gz
cd byron/bootloader/byronjump
make clean
make
cd ../../programmer/firmware
make clean
make main.hex
cd ../../bootloader
./byron.sh

choose byron mode

cd ../puredata
rm byron.pd_linux
leafpad byron.c

change in line 129 10 to 19
change in line 11 40 to 20 (to speed things up)
make
pd byron.help.pd

That’s all !
Have fun !